How to Prepare a Concrete Shed Base (Step‑by‑Step Guide)
A solid shed starts with a solid base. Whether you’re buying your first garden shed or upgrading to a larger, bespoke design, getting the shed base right is absolutely critical. A well‑built concrete shed base ensures your shed stays level, dry, and structurally sound for years to come. In this guide, we’ll walk you through how to prepare a shed base using a concrete base, step by step. This method is exactly what we recommend for our own Puffin Sheds, especially for heavier, pressure‑treated wooden sheds.
We’ll use an 8ft x 8ft shed as the working example, but the same principles apply to any size.
Why a Concrete Shed Base Matters
A properly prepared shed base:
- Keeps the shed level and square
- Prevents moisture rising from the ground
- Reduces timber movement and twisting
- Extends the life of your shed
- Makes installation quicker and easier
While slabs and timber bases can work in some situations, a concrete shed base is the most durable and maintenance‑free option, particularly for long‑term use.
Step 1: Choosing the Right Location for Your Shed
Before you even pick up a spade, location is key.When planning your shed position, remember:
- The quoted shed size (e.g. 8ft x 8ft) refers to the floor size only
- Puffin Shed roofs overhang the floor by approximately 100–150mm all the way around
- You’ll need clearance for roof overhang, fitting, and future maintenance
Recommended Base Size
We recommend making your concrete base at least 100mm (4 inches) larger on all sides than the shed floor.Example:
- Shed floor: 8ft x 8ft
- Recommended base size: 8ft 4in x 8ft 4in
You can, of course, make the base larger if you’d like space for paths, storage, or easier access around the shed.

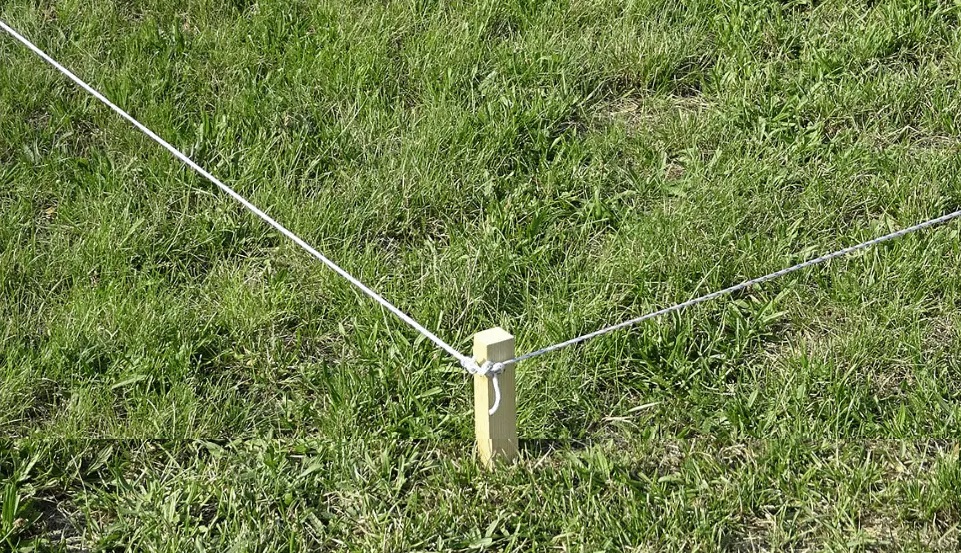
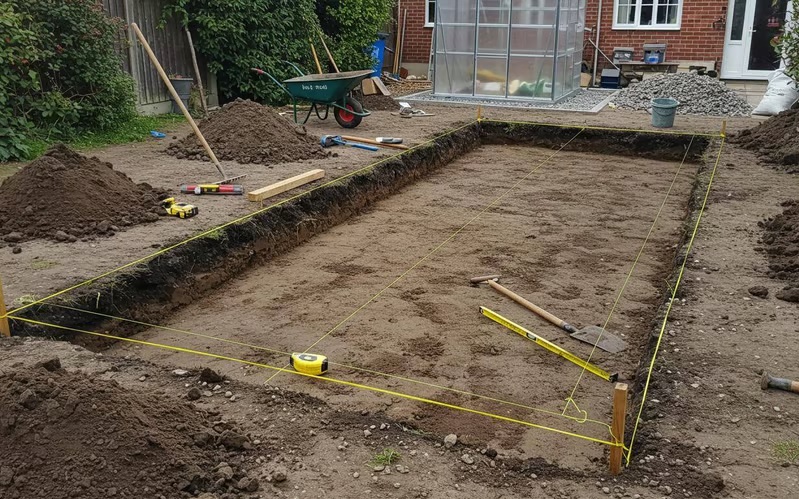
Step 2: Marking Out the Shed Base
Once you’ve chosen the location:
- Use wooden pegs and string to mark out the base size
- Double‑check all measurements
- Ensure corners are square (measure diagonals — they should be equal)
Accuracy here makes everything else easier.
Step 3: Digging Out the Base Area
For a long‑lasting concrete shed base, depth matters.
How Deep Should You Dig?
A typical build‑up is:
- 100mm hardcore (MOT Type 1)
- 100mm concrete
So you’ll need to dig out around 175mm (7 inches) below ground level. This will leave 25mm above ground level once you have poured your concrete. Steps:
- Remove turf and topsoil
- Dig down evenly across the entire base area
- Keep the base as level as possible
Step 4: Laying and Compacting the Hardcore
Hardcore forms the load-bearing foundation of your concrete shed base, so this stage needs to be done properly.
- Fill the dug-out area with MOT Type 1 hardcore to a depth of around 100mm
- Spread it evenly with a rake
- Compact thoroughly using a wacker plate (preferred) or a heavy hand tamper
- Check levels and add more hardcore if needed, then compact again
The hardcore should be solid, flat, and well-compacted before moving on. This layer goes in before any timber boards are fitted.
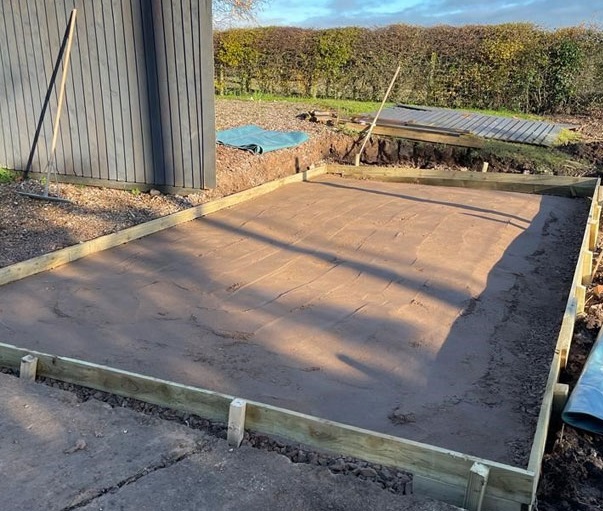
Step 5: Building the Shuttering
Once the hardcore is fully compacted and level, you can install the timber borders that will form the edges of your shed base.
- Use treated timber boards such as 4x1 (or similar) for the shuttering
- Position the boards around the perimeter of the base, sitting on top of the hardcore
- Drive wooden pegs into the ground on the outside of the boards to hold them in place
- Fix the boards to the pegs and adjust until all edges are perfectly level
- Double-check internal measurements match your planned base size (e.g. 8ft 4in x 8ft 4in)
- When installing very large shed bases, at this stage you can opt for a concrete base reinforcement mesh. A metal grid cut to size and led onto you type 1 ready for concreting over. This helps bond large slabs of concrete together but not necessary for the standard shed base
These boards create a strong, level frame ready for pouring concrete and will determine the final size and finish of your concrete shed base.
Step 6: Mixing the Concrete
With the hardcore compacted and the shuttering boards fixed and level, you’re now ready to prepare the concrete. For a standard shed base, you do not need separate sharp sand and gravel if you use ballast, which already contains the correct blend of sand and aggregate. This is the most common and practical option for a shed base.
Recommended Mix Ratio (by volume)
- 1 part cement
- 5 parts ballast
- Mix the cement and ballast thoroughly while dry
- Add water gradually
- Aim for a workable mix that is firm and holds its shape without being too wet
This mix is more than strong enough for a concrete shed base and is ideal for supporting wooden sheds like our Puffin Sheds. For larger bases, ready-mix concrete can save time and ensure consistent results.
Step 7: Pouring the Concrete Shed Base
Now for the main event.
- Pour the concrete into the shuttered area
- Spread evenly using a shovel or rake
- Tamp down to remove air pockets
- Use a straight edge to level across the shuttering
Take your time — a level base makes installing your shed far easier.
Step 8: Finishing and Curing
Once level:
- Smooth the surface with a float if desired
- Lightly brush the surface for grip (optional)
- Cover with plastic sheeting if rain is expected
Curing Time
- Walk‑on: 24–48 hours
- Shed installation: After 7 days
- Full strength: Around 28 days
Step 9: Final Checks Before Shed Installation
Before your Puffin Shed arrives:
- Ensure the base is fully cured
- Check it’s level in all directions
- Clear any debris from the surface
A clean, flat concrete shed base allows your shed to sit perfectly and perform as designed.
Preparing a Shed Base the Right Way
Taking the time to properly prepare a shed base is one of the best things you can do for the longevity of your shed. A well‑built concrete base provides strength, stability, and peace of mind — especially for high‑quality, pressure‑treated wooden sheds like ours.If you’re planning a new shed and want advice on base sizes, shed placement, or bespoke designs, Puffin Sheds are always happy to help.
Now you're ready for your new garden shed.